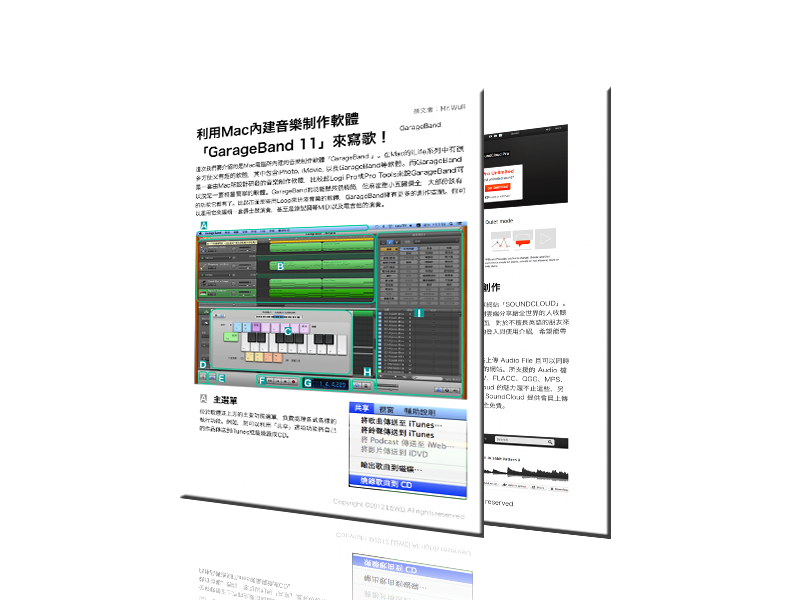
訂閱免費電子雜誌
現在只需填寫下面的表格並點擊【開始訂閱】,你就可以免費獲得【Garageband 操作解析】、【SOUNDCLOUD 登錄功能解析】、【DTM 專門用語】.. 等免費電子書唷。
To utilize the advanced automated zeroing features, the included M6Start , M6End , and custom probing macros ( M2010.m1s etc.) must be copied into the specific profile folder of your machine (e.g., Mach3\macros\Mach3Mill ).
"Retro Revival: Exploring the Classic Mach3 2010 Screenset"
The was an early foundation for many auto-zero macros, but the 2010 Screenset is its natural, modern evolution. While both can automate tool changes, the 2010 Screenset is more refined, polished, and better supported. It offers a more robust and reliable solution for users who need a dependable, "turn-key" auto tool zero system.
This public link is valid for 7 days and shares a thread, including any personal information you added. This link or copies made by others cannot be deleted. If you share with third parties, their policies apply. Can’t copy the link right now. Try again later. Mach3 2010 Screenset
The Mach3 ecosystem has several options, but how does the 2010 Screenset compare?
While the manual is comprehensive, here's a typical workflow for a job requiring a tool change.
Perhaps the most famous feature of the screenset is its robust, built-in tool-measurement macros. For machines without an automatic tool changer (ATC), changing tools mid-program can be tedious. The 2010 Screenset automates this via two touchplates: To utilize the advanced automated zeroing features, the
If your spindle uses a laser diode for visual edge-finding, the 2010 Screenset includes dedicated offset buttons. Zero your laser on the workpiece corner, hit the button, and the machine automatically shifts the physical spindle precisely over the zero point. How to Install the 2010 Screenset
This feature saves hours of setup time on complex, multi-tool 3D carvings and precise pocketing operations. Advanced Features for Enhanced Production
: You use a mobile touch plate to zero your first tool to the top of your workpiece. Automatic Sub-Zeroing It offers a more robust and reliable solution
: Recommended for use with Mach3 version 3.42.040 , as newer "lockdown" versions (like 3.43.022) have been reported to freeze during tool changes.
It works flawlessly with standard parallel port setups as well as modern external motion controllers like the Warp9 SmoothStepper (ESS), UC100, or Pokey5.
You load tool one, manually jog to the material, use a piece of paper to find Z-zero, and run the first file. When it finishes, you change the tool, carefully manually re-zero the Z-axis without moving X or Y, and run the second file. If you make a slight error while manual zeroing, your finishing pass will ruin the workpiece. With the 2010 Screenset:
The streamlined graphics of the 2010 Screenset are optimized to consume fewer system resources than the default interface. This reduces the likelihood of display-induced stuttering or latency on older control computers running the parallel port driver. Installation and Compatibility
The crown jewel of the 2010 Screenset is its built-in macro system for tool changes and probing. It automates the most tedious part of CNC machining through two primary functions:
現在只需填寫下面的表格並點擊【開始訂閱】,你就可以免費獲得【Garageband 操作解析】、【SOUNDCLOUD 登錄功能解析】、【DTM 專門用語】.. 等免費電子書唷。